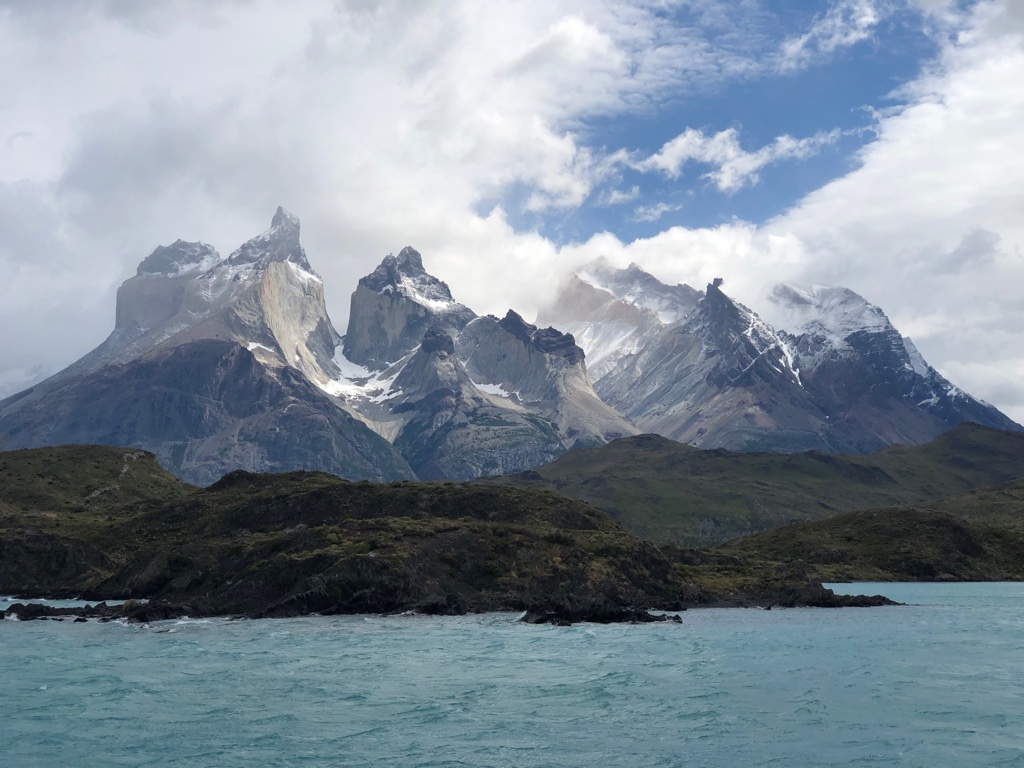
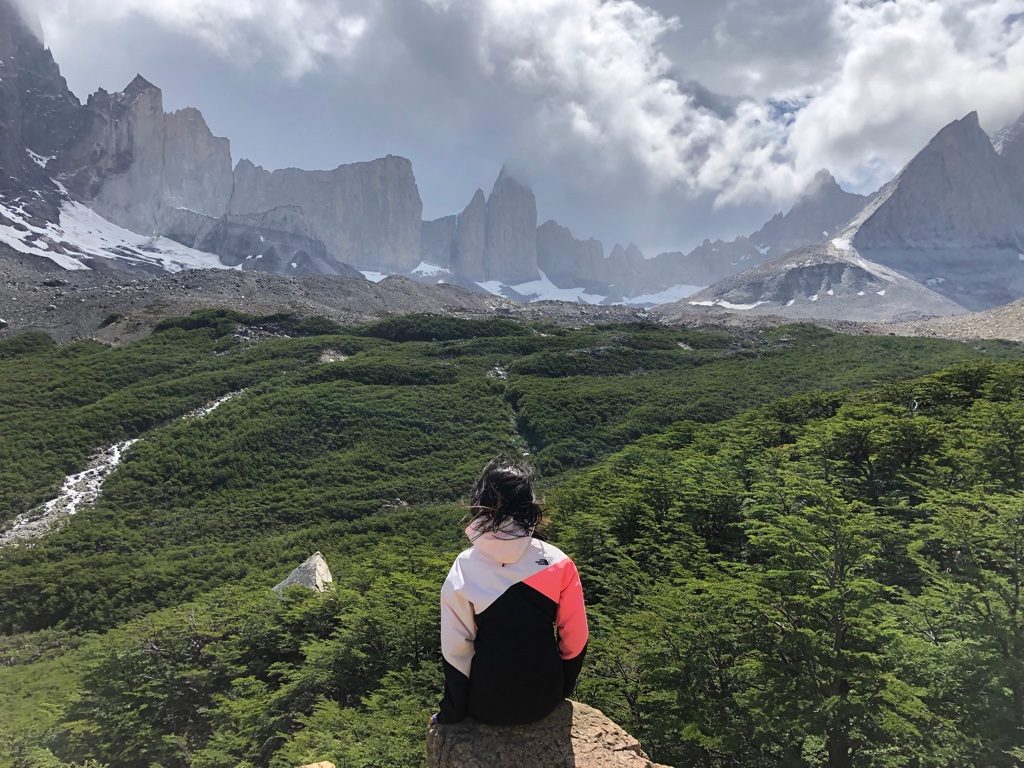
To see Torres del Paine is to see what beauty our earth has to offer at the edge of civilization. This park has probably some of the most awe-inspiring natural beauty either of us has ever seen. Aside from the views is the experience itself, a 50 mile hike over 5 days/4 nights, decently challenging yet completely doable for even a casual hiker with enough determination. I had never done a multi-day hike before, especially not one where I’m carrying everything I’ll be needing for the next 5 days.
I was so uninformed before researching, I even had a vague fear we’d have to dig holes when we needed a bathroom. Or that we might get lost in the woods over these 5 days. Rest assured that the W is a very clearly defined path. You will be amongst many other trekkers doing the same thing, and each night you’ll be staying at a campsite with facilities, not all alone in the middle of nowhere.
Each day, our bodies accumulated more and more fatigue. We woke up every morning to an early alarm, reawakening to the soreness in our bodies and anticipation of the day’s new challenges, whether a steep ascent, a lot of distance to cover, or often both. And each day, doing the actual hike proved manageable to us; it’s as simple as continuing to move forward. At the end of accomplishing our goals every day, it was always the most victorious feeling of satisfaction that we’re done for the day, we made it.
Hiking this trail was such a memorable experience, and I left it not only with some nice pictures but also a gratifying sense of accomplishment. I encourage anyone who like me, felt a bit of nervousness about the whole idea to yes, go for it. Below we offer a very detailed outline of our experience and tips for this hike.

The Campsite Booking Process:
For our very standard west to east itinerary, you’ll want to book the following campsites:
- Night 1: Refugio Grey (Vertice)
- Night 2: Refugio Paine Grange (Vertice)
- Alternative: skip booking this night and do the W in 4 days/3 nights
- Night 3: Refugio Frances (Fantastico Sur)
- Alternative: Italiano (CONAF)
- Night 4: Refugio Chileno (Fantastico Sur)
- Alternative: Central (Fantastico Sur), but would not be able to make sunrise at Las Torres
You are required to book a campsite for every night you’ll be staying. Different campsites are run by different companies: Vertice, Fantastico Sur, and CONAF; so you’ll have to book each campsite on the corresponding website.
Before making a single reservation, make sure each campsite on your route is available for the nights you want to stay. Expect an incredibly frustrating process of finding say, 3 out of 5 campsites available for your dates, but the last 2 you need are unavailable. When this happens, you’ll have to be flexible with your dates, or find alternative nearby campsites. When you get to a point where everything is available for the dates you need it, book them all in one straight shot.
In our experience, we realized we had to secure campsites before even booking flights to Chile. That’s how bad it was. We combed through maybe 6 weeks worth of dates before finding the necessary campsites on back to back dates. One of them we had to settle on a backup. But closer to the date, we checked everyday for our preferred site, and it managed to pay off. For reference, we searched in the month of September, hoping to hike over winter holidays, but could only find dates beginning in the new year. Book early!
Lastly, there are a number of different selections you have to make when booking. More convenient options cost considerably more. Decisions include the following:
- Refugio or campsite? Refugios are shared cabins where you’re booking a bed, campsite is a spot for a tent
- Have them set up a tent for you or bring your own?
- Meals provided? Which ones? “Full board” provides all meals during your stay and “half board” provides only some, or you can bring your own entirely
These decisions are made on a per campsite basis, as the options differ per campsite.
Getting to the park:
From wherever you are in the world, or maybe just a different city in Chile, you first need to get yourself to the city of Puerto Natales. It’s a few hours away from the park but still the closest entry point. The hard part is there’s no airport in Puerto Natales. To get there, you first have to fly to Punta Arenas, then take a bus to Puerto Natales. From Puerto Natales, you take a bus into Torres del Paine. All this is detailed in Day 0 and Day 1 of the itinerary below.
That said, other things to book in advance:
- Flight to Punta Arenas
- Lodging in Punta Arenas (you can’t do all that traveling in one day so you’ll need a night here)
- Bus from Punta Arenas airport (PUQ) -> Puerto Natales (Terminal Rodovario Puerto Natales). Ours was $12/person.
- Bus from Puerto Natales -> Torres del Paine. Ours was $16/person
- The remainder of the buses, including bus from Puerto Natales back to Punta Arenas we purchased later
For both buses to get to the park, we bought it the day before but we were lucky they had options left. It’s much better to book them in advance. busbud.com is a preferred site of mine since it’s so easy to use. But to see the full list of bus companies that serve the area, check out http://www.parquetorresdelpaine.cl/en/buses-regulares.
Lodging in Punta Arenas:
As I mentioned, you’ll need a minimum of one night in Punta Arenas. There’s not much else going on in this city but it’s very geared towards hikers getting ready for the park. We stayed at Big Bang Patagonia, which was excellent. They allow you to store luggage while you hike the W, and come back to pick it up later. This was essential to us. We also realized shops would be closed by the time we arrived in town, and we were 100% screwed if we didn’t find a fuel canister by next morning. So we gave a desperate call ahead of time asking if they could buy one for us to reimburse them for, which they did readily. Room was basic, but clean. They have breakfast available bright and early in the morning so it’s one less thing to worry about.
Essentials to bring:
- Passport (campsites will ask for these when checking in)
- Print outs of campsite reservations (for some reason it’s emphasized that these need to be printed out)
- Cash (needed for tickets inside park)
- Small backpack (several days will require one for short hikes)
- Phone chargers, portable chargers (campsites have areas where you can plug in)
- Headlamps, at least flashlights (if you’re hiking to see sunrise at Las Torres)
- Big garbage bags (a local provided a tip to line the interior of our backpacking bag with a garbage bag for waterproofing purposes. He said bag covers weren’t enough if it pours, but luckily we didn’t need to)
- Don’t bring (if you were wondering): Water purifier, or much water in general – running streams are clean to drink straight out of
Amount of cash you’ll need to carry into the park:
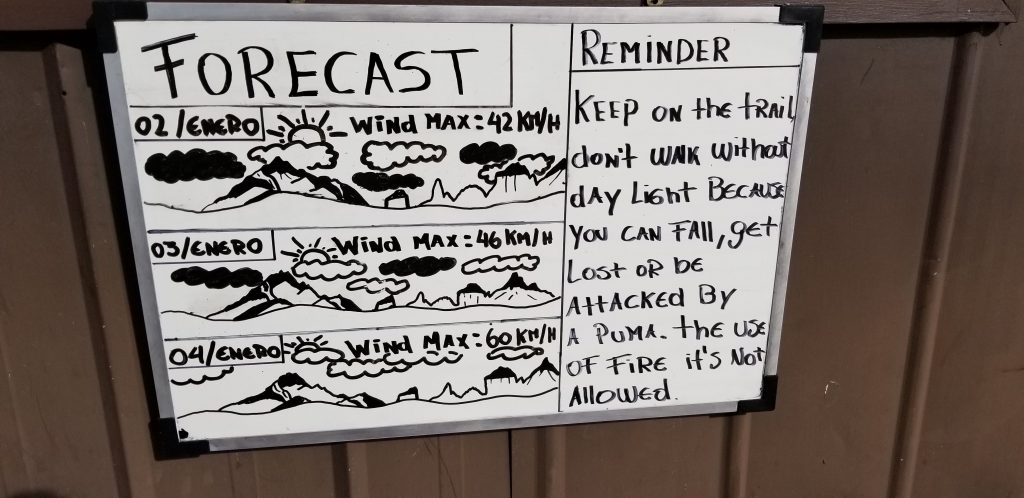
- *Note: the following prices do fluctuate. Park entrance differs depending on season, for example. So verify online before going.
- 21,000 CLP – Park entrance fee (I believe card was not accepted)
- 18,000 CLP – Ferry from Pudeto
- 3,000 CLP – Bus from Hotel Las Torres to Laguna Amarga
- ?? – Bus from Laguna Amarga to Puerto Natales (I can’t remember how much we paid for these tickets and whether credit card was acceptable here)
- Extra cash for buying snacks or whatever at campsites

Itinerary
Day 0 – Tues 1/1
We’ll call this day 0 because all this traveling is just to get to Puerto Natales today. Once there, you can take the rest of the day to prep for the hike, including purchasing or renting any gear if you need. Getting into the actual park starts the next morning, bright and early.
- 5:30pm – land at PUQ (Punta Arenas airport)
This was when we landed, but I advise getting in much earlier if you can, so the rest of the day is not so rushed. If you get to Puerto Natales in time, there’s a free 3pm talk at Erratic Rock that everyone says is extremely helpful. - 6:30pm – Bus from Punta Arenas -> Puerto Natales (2hr 45min)
Note that there is no bus stop or even signage at the airport indicating where you’re supposed to wait, and that made us incredibly stressed. Rest assured, when the airport personnel point you to a random spot on the sidewalk by the exit, that’s where the bus picked us up, albeit very late. - 9:30pm – Check in at Big Bang Patagonia (hostel)
Pack everything you’ll need for the hike. For the bags you won’t be needing, hand them to the staff to lock away. We did this the night before so we wouldn’t have to worry about it the next day. - 11:00 pm – Eat dinner at Base Camp (restaurant)
Pizza. Bar. They’re open very late. I loved the atmosphere of this place. Everyone was dressed head to toe in bright outdoor apparel. It felt lively, adventurous, and I felt a sense of camaraderie with everyone because of our (soon) shared experience… or maybe I was just projecting. - 12:00am – Sleeeep!
Day 1 – Wed 1/2
Today’s main focus is getting into the park, to the tippy top, left point of the W. You’ll be taking a 3hr bus ride to Pudeto, then a scenic 30min ferry to Paine Grande. From there, day 1 eases you into your multi-day hike with a 3-4hr hike to Refugio Grey (campsite), where you then have the entire evening to relax.
Getting into the park
- 7:00am – Bus (2hrs): Board the bus in Puerto Natales
You will be leaving from the main bus station, i.e. Terminal Rodoviario Puerto Natales - 9:00am – Arrive at Laguna Amarga Ranger Station
The bus makes its first stop here, at the gateway to the park. Pay for the park, get your map, and ask rangers any questions. All the buses arrive here around the same time, and it quickly becomes crowded, so hustle. - (When you’re done) – Get back on the same bus for another ~40min ride.
- 10:00am – Arrive in Pudeto
This is stop number 2. When you get off, hustle even harder to line up for the catamaran (ferry) since the boat fills up. It only makes a couple of trips so if you’re too behind in line you won’t be able to start your hike. Pay by cash on the ferry. - 11:00am – Take the catamaran (30min) over Lago Pehoe (lake)
In our experience, it arrived late, so don’t worry if you don’t see it at 11am. We recommend sitting outside and looking behind since you will have such “wow” views from this ferry. - 11:30am – Arrive at Paine Grande. Eat some lunch
These are great facilities to have lunch in before you begin your hike.
Your hiking begins here!
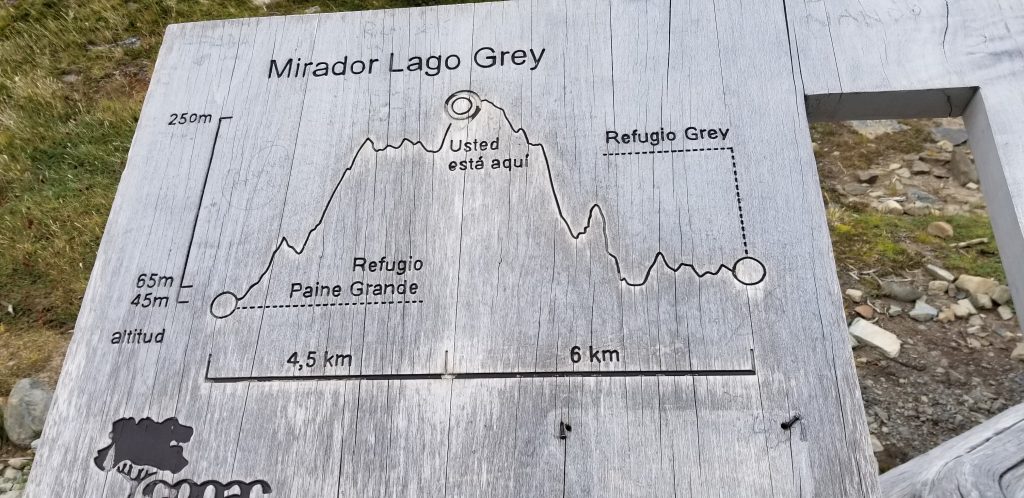
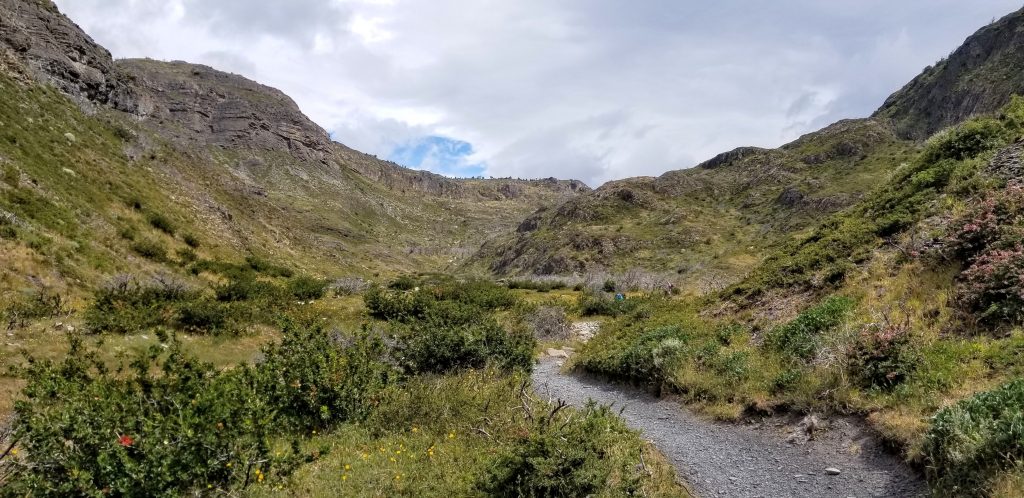
- 12:30pm – Hike to Refugio Grey (campsite) (3-4hrs)
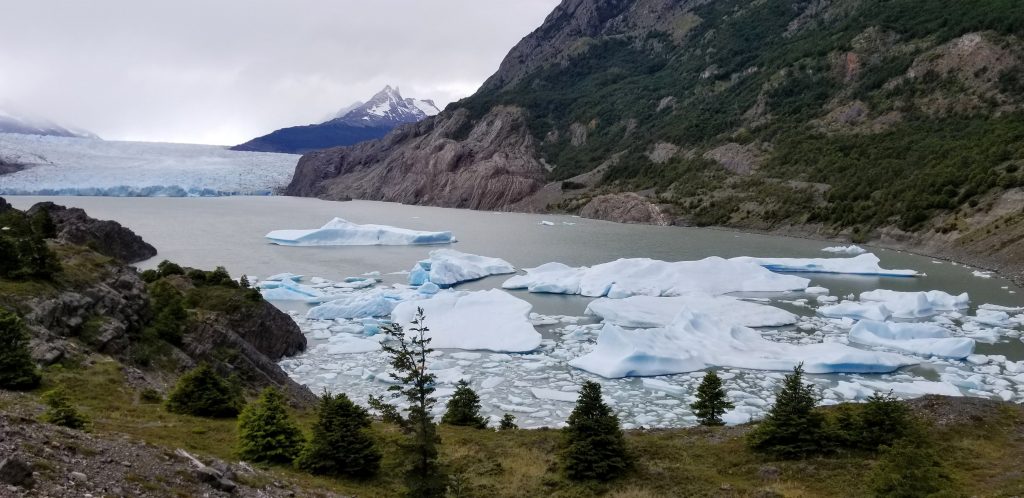
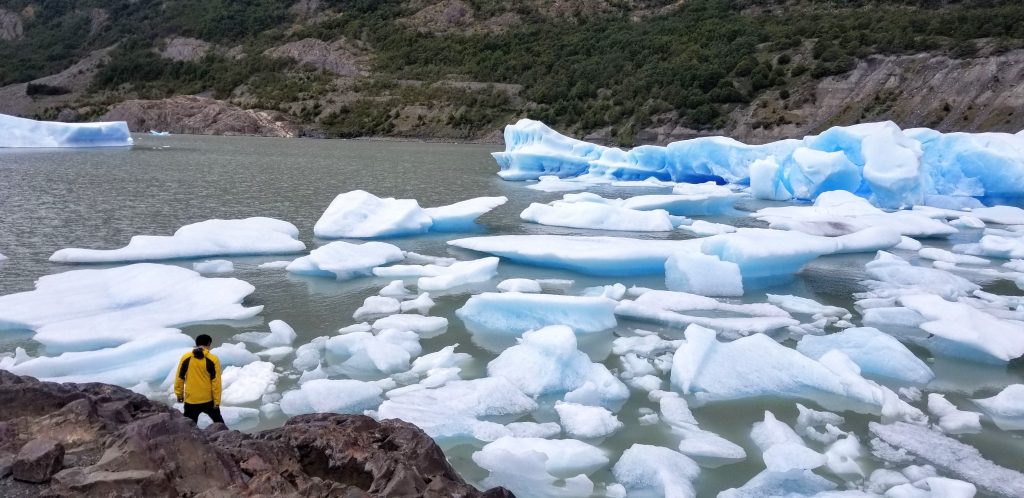
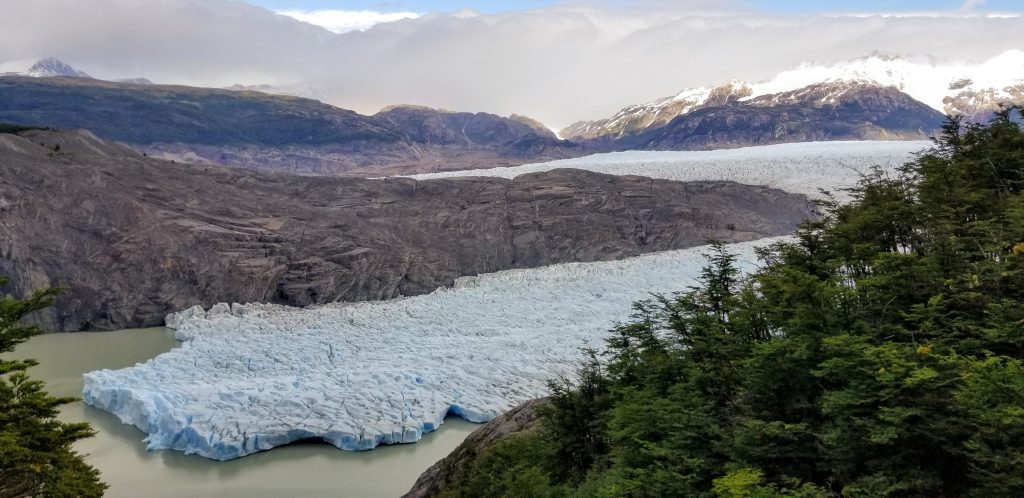
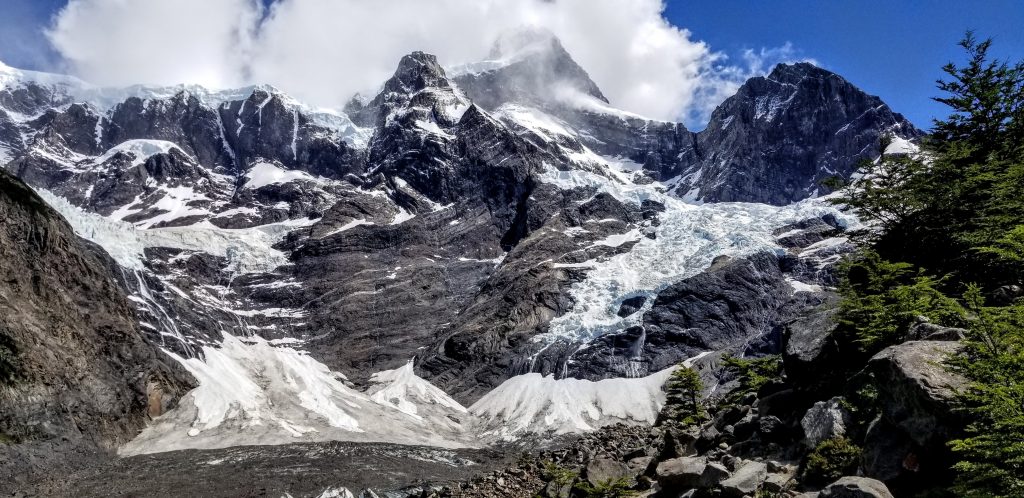
It’s uphill through some windy valleys through the first half. But I was nervous to be starting this journey, my adrenaline was pumping, and if you’re in the same boat as me when you first get started, don’t worry that energy will get you through here just fine. Eventually you’ll pass Mirador Grey, a lookout point to see Glacier Grey from afar. It becomes more downhill as you hike through some good views of Lago Grey (lake). - 4:30pm – Arrive at Refugio Grey
Drop your bags, set up camp - 5:15pm – Walk another 10-15min to the edge of lake
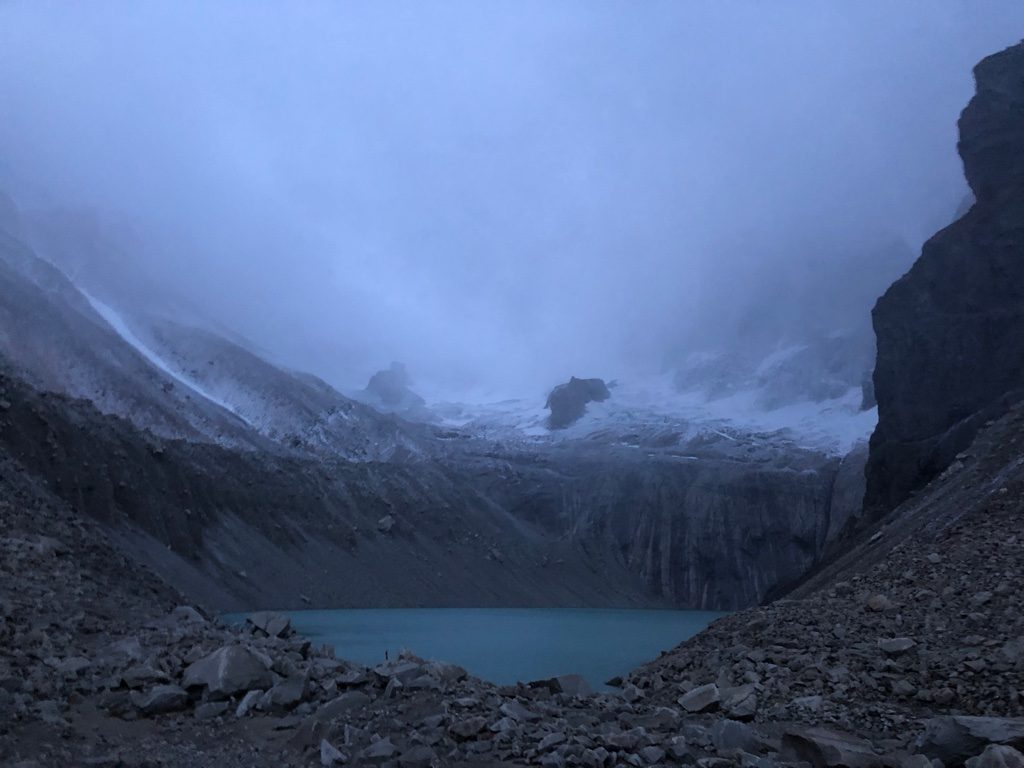
Just a short walk north of the campsite, you might get a much more intimate experience of Glacier Grey. I’m not sure if it’s typical, but when we got to the edge of the lake, there were chunks of ice from the glacier that had floated to that area. We were even able to climb down and fetch a piece for some creative pictures with it. Just felt like a very rewarding way to end the first section of the W. - 6:15pm – Head back to camp and eat dinner, you made it through day 1!

Day 2 – Thurs 1/3
Today’s hiking comes in 2 parts. The first is just with your day bag to a much closer viewpoint of Glacier Grey. Part 2 is with all your stuff, right back down to Paine Grande where you were the first day.
Why didn’t we just stay in Paine Grande the first night? Yes, the way it’s planned, you’ll have to carry your heavy bag both ways on this leg of the W. But if you camped at Paine Grande on day 1 and did a day hike to/from Glacier Grey, the downside is you’d have less time to explore Glacier Grey, plus it’s suddenly a lot of hiking on day 1. As a noob to multi-day hikes, I enjoyed keeping it short and building that confidence on day one =) So those are the tradeoffs.
Hike with day bag to Glacier Grey
- 8:00am – Wake up
Eat breakfast. Pack a day bag with water and snacks. You can leave the rest of your stuff because you’ll be coming back for it later - 9:00am – Hike to better viewpoints of Glacier Grey (1.5-2hrs)
- Follow the sign for Paso campsite (you’re just heading in that direction, not reaching there)
- 10:30-11:00am – Soak in views at various viewpoints
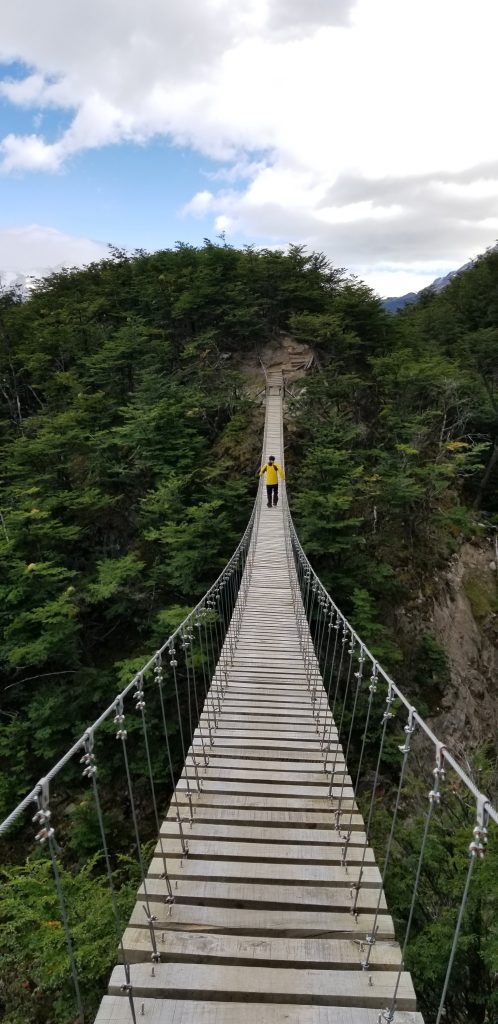
- After you cross a hanging bridge, which I thought was pretty cool btw, you’ll soon find some nice spots to see the glacier.
- If you keep going, you’ll come across a second bridge, and it’s not too far. We thought it was worth it to cross this one too as you’ll find even nicer views on the other side
- Head back to Refugio Grey when ready (1-1.5hrs)
- 12:00-12:30pm – Arrive at Refugio Grey, eat lunch and pack up all your stuff
Hike with full bag back to Paine Grande
- 1:30pm – Hike to Paine Grande (4.5-5hrs)
It’s the same hike as yesterday, you know what to expect! - 5:30-6:00pm – Arrive at Paine Grande
Set up tent, eat dinner, and rest


Day 3 – Fri 1/4
You have quite a steep and challenging hike ahead of you today. The good news is, those parts will be done with a day bag. And for your pain, you will be rewarded with some of the most majestic views Torres del Paine has to offer, in our humble opinion.
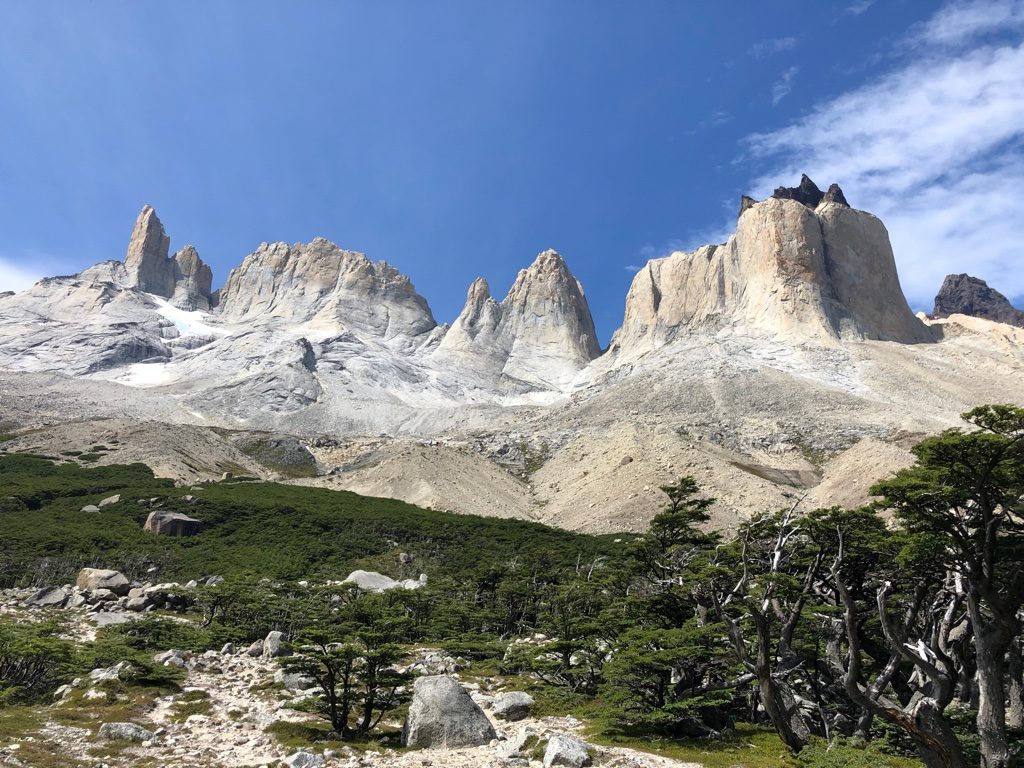
I’m referring to the Mirador Frances (viewpoint) and Mirador Britanico (viewpoint). We feel their grandeur actually surpasses Los Torres (the famous towers), but the towers simply get all the love because it is not as deep within the park, thus more accessible. Just sayin’.
Hike with full bag to Italiano campsite
- 8:00am – Wake up
Eat breakfast, pack up all your stuff - 9:00am – Hike to Italiano campsite (2.5hrs)
Along the way, you will pass Lago Skottsberg (lake) - 11:30am – Arrive at Italiano campsite
Take some pics of the epic bridge over rapid waters. Pack a day bag with water, lunch, and snacks. You can leave your big bag around the office; it won’t be watched but there will be many other bags from others doing the same thing
Hike with day bag to Mirador Frances & Mirador Britanico
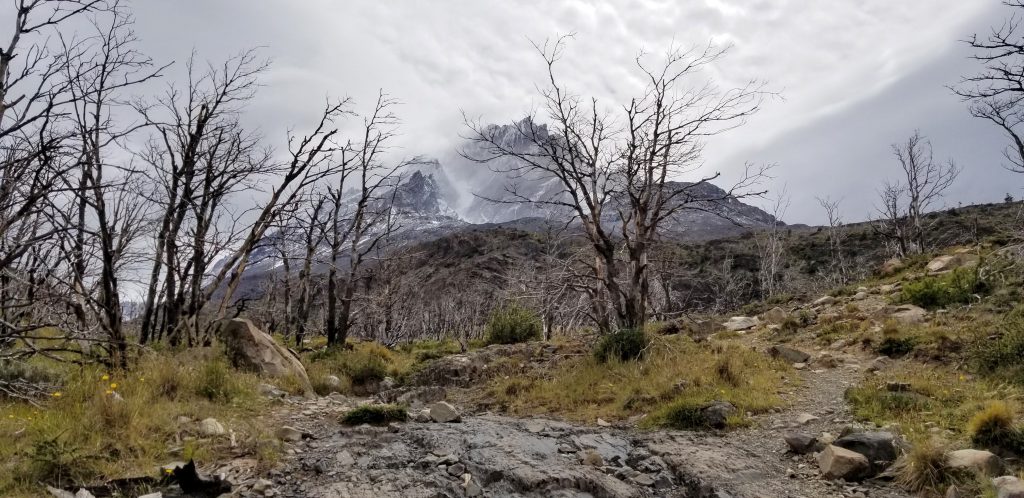
- 12:00pm – Hike to Mirador Frances (1hr)
The hike is intensely uphill and also becomes very rocky, so it’ll be challenging. The route is also not marked as clearly, so you kind of guess and check for new markers as you make your way. - 1:00pm – Arrive at Mirador Frances
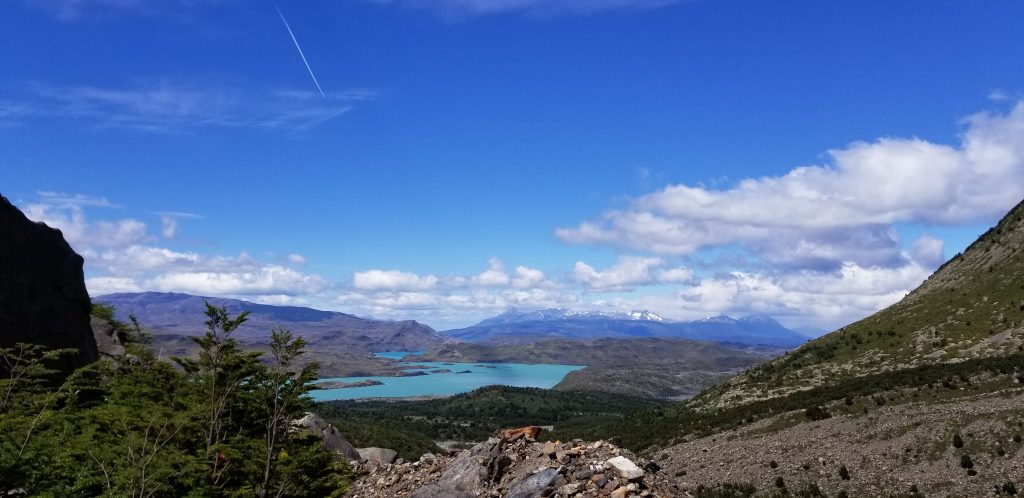
Eat lunch here and take your time to marvel at the views! Everywhere direction you look, there is something to see. The main view shows off rocky snow covered cliffs, and it is not uncommon to see small avalanches if you look out for them. Behind you is Los Cuernos, the other side of what you caught a glimpse of on the ferry into the park. For a bonus third view, there’s even a view of Lago Nordenskjöld (lake) in the distance. - 1:45pm – Hike to Mirador Britanico (1.5-2hrs)
From Mirador Frances, it’ll feel like another long hike to Mirador Britanico but rest assured you’ve already done much of the hard part by getting to Frances. The scenery will change a few times from gushing rivers, to forests, to open clearings. There’s only a final burst of uphill right before the destination. - 3:30p – Arrive at Mirador Britanico
When you finally reach the lookout, you will feel on top of the world, surrounded by 180 degrees of towering cliffs as you sit in its center. It’s cold, the clouds change quickly, sometimes obscuring the cliffs, and the drizzle turned briefly into hail while we were there. Through all this, we waited it out and eventually got some glimpses of a clear sky view.
Hike to Refugio Frances
- 4:15pm – Hike back to Italiano campsite. (2-3hrs)
Return the same way you came! - 6:15pm – Arrive at Italiano, grab full bags, hike to Refugio Frances (30min)
You’re almost there… - 6:45pm – Arrive at Refugio Frances
You made it! Eat some dinner, enjoy your hard earned rest.


Day 4 – Sat 1/5
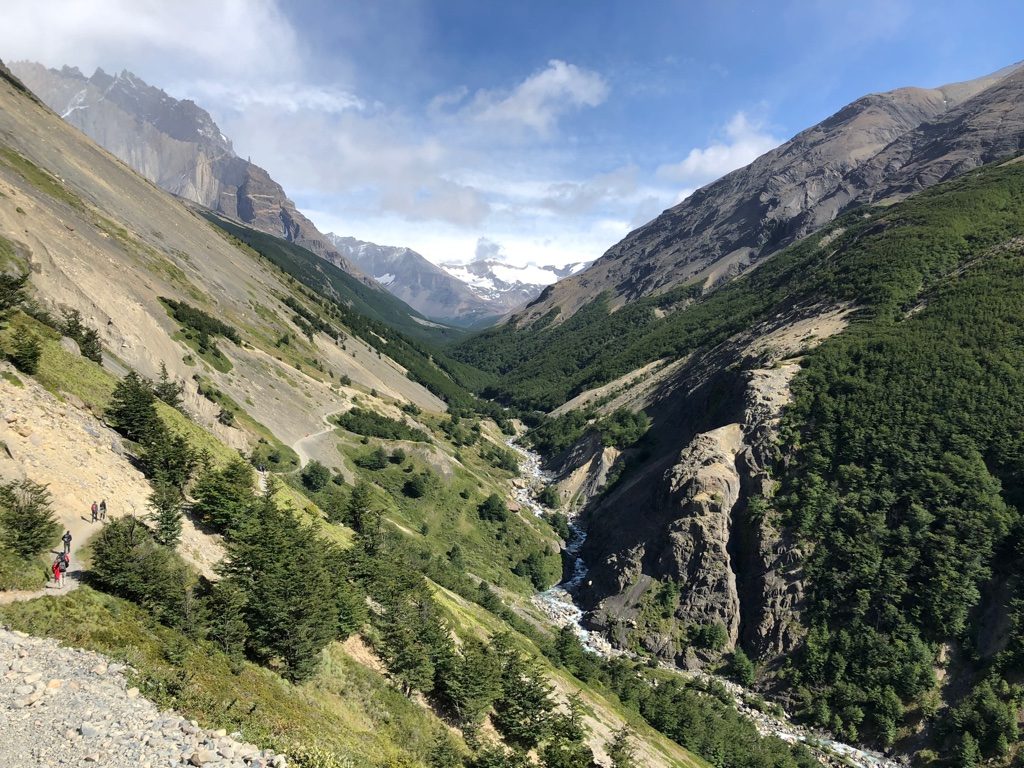
I must say, today’s views will be kind of boring. You’ll be seeing a lot of Lago Nordenskjöld (lake), which is admittedly pretty beautiful, but otherwise, there’s a lack of highlights. Your efforts today will pay off though. Getting to Refugio Chileno will put you in a good spot for day 5!
Note: This itinerary has us camping at Chileno because it was the closest open campsite to Mirador Base Las Torres. Camp Torres is the closest, but it was closed during the season we went and seems like it will be for a while.
Hike to Refugio Los Cuernos
- 7:30am – Wake up
Eat breakfast, pack up all your stuff - 8:00am – Hike to Refugio Los Cuernos (2hrs)
This portion begins uphill but eventually you make a long descent right down to the edge of Lago Nordenskjöld. From there, you’ll continue briefly on the rocky banks alongside the water before it pops back into the trees. Don’t worry, you’re going the right way. - 10:00am – Eat lunch on the rocks
I don’t know about you, but by then we were ready to eat already. On top of that, it’s a great experience having lunch sitting on some big rocks with a little stream running through them. So we chose to eat out here. - 10:30am – Arrive at Refugio Los Cuernos
This campsite has a big, homey wooden building that’s the perfect place to rest up in. There are outlets for charging and even real food if you need a break from your freeze-dried meals!
Hike to Refugio Chileno
- 11:00am – Hike to Refugio Chileno (5hrs)
Yup, that’s a lot of hours. I barely even took pictures today because I was so focused on just powering through, plus you know, lack of highlights. - 2:00pm – There’s a fork in the road
There’s nothing significant about this. It’s a clearly marked sign: to the left is “Sector Chileno”, to the right “Hotel Las Torres”. Sorry you’re not going to the hotel, and you have an intense 2 hour climb from here. But you’ll thank yourself tomorrow. - By the way, I forget if this was before or after the fork, but we encountered an unbelievably deep muddy patch at some point. Scouting all about, we could not find another way. Yes, you’re supposed to cross it. My best advice is to poke around with a walking stick as you cross. Even then, I tried to gingerly place one foot in front of the other- *poke poke*, “safe”, *step*, *poke poke*, “safe”… All was well until a gust of wind knocked me into the mud. F*ck this I wasn’t going to make it out alive so I instinctively sprinted through the mud to the other side. My boyfriend who had already crossed safely absolutely died laughing.
- 4:00pm – Arrive at Chileno
Rest, eat dinner, sleep early today! Check the weather for tomorrow. If it’s going to be too cloudy, there’s no need to go for sunrise.

Day 5 – Sun 1/6
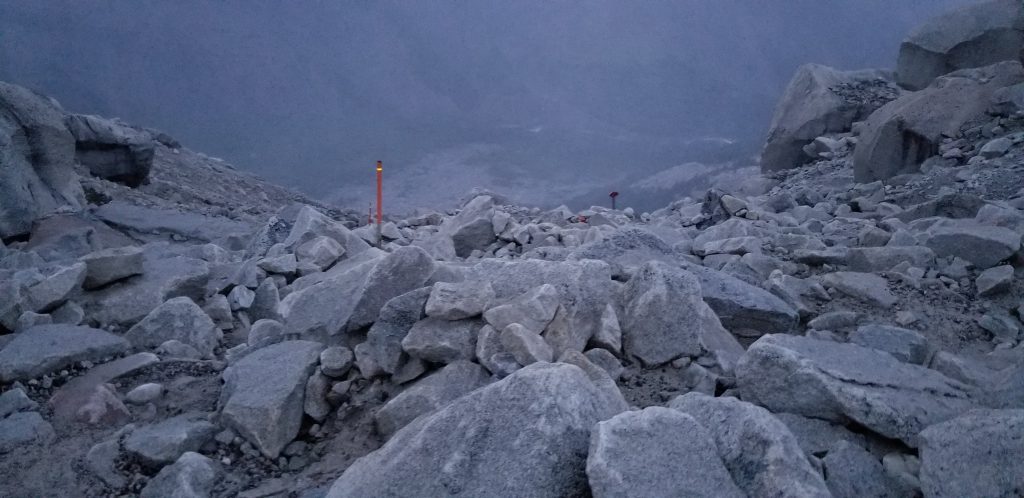
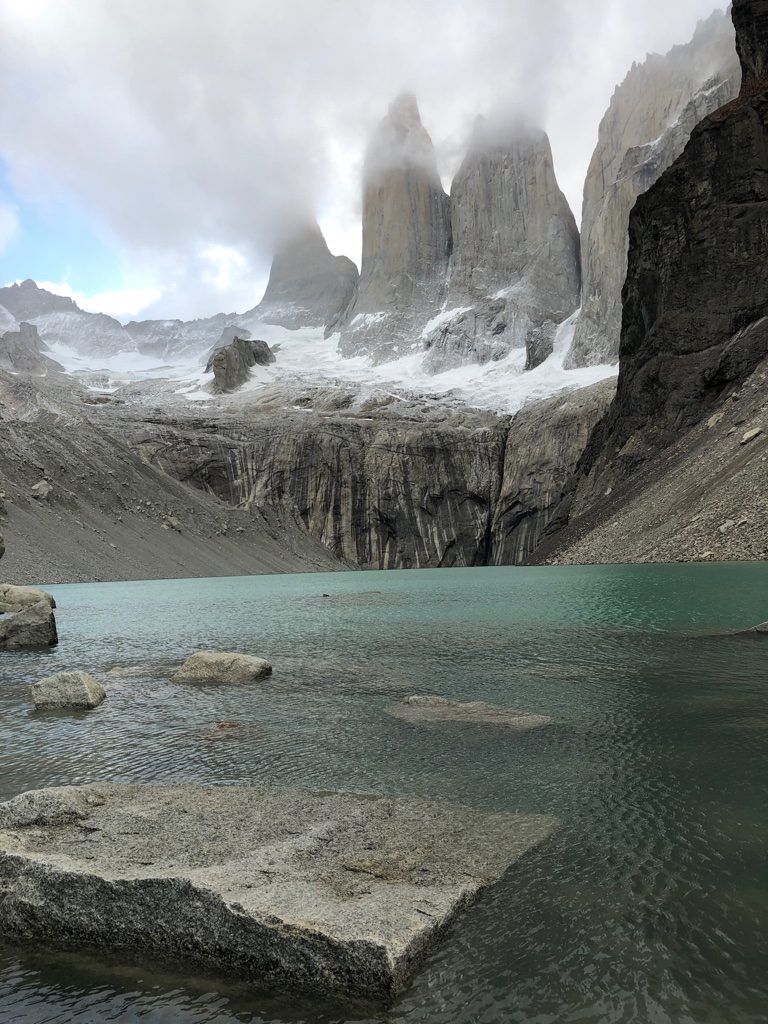
It’s Las Torres day! We’re going to see the towers that give the park its name. And we’re going to see it at sunrise because that’s the thing people do. Have you ever hiked in pitch black darkness before? I hadn’t.
Hike to Las Torres
- 4:00-5:00am (depends on sunrise time, so check!) – Wake up
Pack a day bag and pack up everything else separately. You should leave the rest of your stuff in the cabin where they have a bunch of cubbies since you’ll be back after check-out time. - 4:30-5:30am – Hike to Mirador Las Torres
This section was on the doable side and it allowed us to set a decent pace. The only thing was having to get used to hiking in the dark, only able to see a few feet ahead of me thanks to my headlamp, which attracts tiny annoying flies. I spent my time wondering what I’d do if I ran into a puma. - (Forgot what time, sorry!) – Pass Camp Torres
In the dark, it appeared to us like there were two paths we could take from here: one that continued along the side of the mountain, and one on the left that climbs up the mountain. The path is to go up. Mother Nature pretty much dropped a giant staircase of rocks on this path. When you’re done with that, it becomes scrambling up the side of the mountain on medium sized rocks. - 6:15-7:15am – Arrive at Mirador Las Torres
Watch the sunrise hit the towers! Sometimes it’s too cloudy so be prepared to wait it out in the freezing cold. We must’ve waited at least an hour before it cleared up, and only briefly. We saw others were wise to bring a sleeping bag here while waiting, might be a good idea. I was like dying from the cold.
Hike back to Chileno
- 8:30am – Hike back to Chileno
Feel like a champ every time you pass tired people making their way up. Every other time, that is always us, but today we are the overachievers already on our way down. - 10:00am – Arrive at Chileno
Eat lunch. This is another campsite where you can purchase real food in their nice cabin if you’d like. Inside, there’s an extremely useful board where they write bus departure (including connection!) times. Staff are also onsite to answer questions.
Hike to Hotel Las Torres
- 10:30am – Descend to Hotel Las Torres
Grab the rest of your stuff and walk a long way down to the hotel. You’ll pass crowds of people huffing, puffing, and dragging themselves directly from the hotel to the mirador. To put into perspective, that’s climbing from almost the lowest elevation of the W to the highest elevation of the W in one straight shot. Multiple times, people asked us how close they were to the towers when they were nowhere near even reaching Chileno. Our honest responses always led to such heartfelt groans of disappointment. …and that, my friends, is why it was wise to climb to Chileno the day before!
Catch various buses back to Punta Arenas
- 12:00pm – Arrive at Hotel Las Torres, catch shuttle to Laguna Amarga
You can pay directly on the bus. - 3:00-3:30pm – Take bus from Laguna Amarga to Puerto Natales
Buy tickets for this bus here at the ranger station. - 5:00pm – Arrive at Puerto Natales
Buy bus tickets back to Punta Arenas when you’re here. There were many options so we didn’t book ahead of time to allow us flexibility. Pick up your remaining luggage from the hostel. Come back to the bus station to catch your bus back to Punta Arenas. - 6:30pm – Take bus from Puerto Natales back to Punta Arenas


We arrived.. what towers? COLD.

We effin’ did it! This experience will forever be ours to keep. If you’ve yet to set out, good luck! and you’re going to have an amazing adventure.